Working with Rewards
Working with incentives can be a multi step process, here is a quick way you can start working with Omneo rewards. For this process, you can use Postman to communicate with the Omneo API. If you haven't already, you can complete the Getting started with Postman.
Before you start
We recommend you review these articles to familiarise yourself with the different incentives Omneo offers.
[Rewards] (https://help.omneo.io/hc/en-au/articles/360000426095-Rewards)
[Tiers] (https://help.omneo.io/hc/en-au/articles/360000426115-Tiers)
[Achievements] (https://help.omneo.io/hc/en-au/articles/360000426075-Achievements)
[Benefits] (https://help.omneo.io/hc/en-au/articles/360000038395-Benefits)
Working with Rewards
Applying a reward to an account can be summarised into the below steps:
- Create a Reward Definition (If you already have one, you can skip this)
- Create the reward, assigning it to a profile
- Create a redemption of the reward
- Create a transaction and link it to the redemption
Create a Reward Definition
Reward definitions explain what your reward is and how it should be used.
It also holds key logic stating rules for the redemptions such as expiry, start/end dates, the time period for eligibility. For a complete list of these rules, you can look at the API docs on Reward Definitions.
To create a definition, we can use the Add Reward Definition endpoint.
With the below payload:
Note down theid of your definition
{
    "name": "Birthday Reward",
    "handle": "birthday-reward",
    "value": "10",
    "type": "birthday",
    "period": "30",
    "description": "Birthday reward valid for 30 days",
    "short_description": "It's your birthday! $10 for you!",
    "long_description": "<p> Another year! enjoy $10 off your purchase </p>",
    "terms_conditions": "Valid for 30 days",
    "earn_instructions": "Be a member with us, and receive $10 off on your B'day!",
    "icon": "https://example.com/icon",
    "image_url": "https://example.com/image",
    "internal_notes": "Available once per year",
    "is_assignable": true,
    "is_reassignable": false,
    "is_extendable": false,
    "tags": [
        "bday",
        "anniversary"
    ]
}
You've now created your reward definition.
You don't have to create a definition each time, as long as you're assigning your birthday rewards like we've created above. If you wanted to create a "customer service manual" reward, this definition doesn't exist yet, so you'll need to repeat the steps above to create your new definition. The names of definitions are unrestricted and you can create as many as you need for your requirements.
Create a reward, and assign it to a profile.
Now that we've created our definition, we still need to create the reward.
When creating a reward, you need to specify the definition to use for the reward.
You can create a reward using the Add Reward endpoint.
Make sure to substitute yourprofile_id into the below request
Note down theid of your reward
{
    "reward_definition_id": "6",
    "profile_id": "{YOUR_PROFILE_ID}",
    "value_initial": "10",
    "value_remaining": "10",
    "expires_at": "2022-02-10 12:59:59",
    "issued_at": "2021-02-10 10:00:00",
    "timezone": "Australia/Melbourne"
}
So far, we've created the definition assigned a reward to the definition.
The reward we've just created is for $10, and has $10 remaining.
It was issued today, and expires next year.
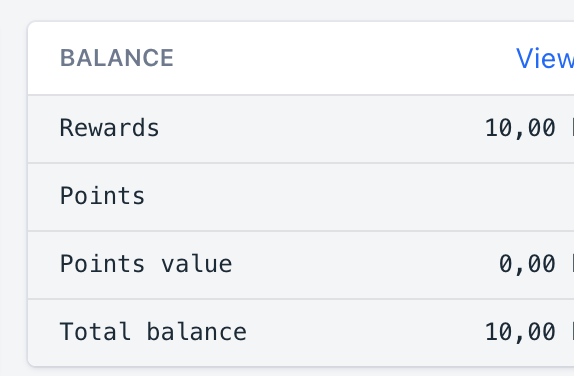
If you navigate in your CX Manager to this users profile, you'll see now that they have $10 available as a reward balance on their account!

Now that we have an available reward balance, we can use use it for discounts against transactions.
If you query the profile using the Read Profile Balances endpoint, you can see this user has $10 available.
{
    "data": {
        "reward_balance": 10,
        "point_balance": 0,
        "point_balance_dollars": 0,
        "combined_balance_dollars": 10
    }
}
Add a reward redemption
This is the process of "cashing in" the reward we've just configured and assigned to a profile.
Redeeming a reward uses the available reward balance and not a specific reward.
Each reward is deducted accordingly, with the closes expiry date being deducted first.
In this case, we only have a single reward, so If we redeem the full $10 it will come off the one reward.
use the Add Reward or Point Redemption endpoint, to redeem the reward.
Note down the redemptionid, you will need this to attach to a transaction
{
    "strategies": [
        "rewards"
    ],
    "amount": "10"
}
So far we've created a definition, created a reward, and cashed in the reward.
You'll notice now, this profile's available reward balance is now $0, because we've just redeemed the balance in the previous step. We're not done yet!
Attach a reward to a transaction
The final step is to add this reward to a transaction. If this was a manual redemption, you won't have a transaction, so this is unnecessary. However, we are simulating that this customer purchased something from a store using their $10 birthday reward balance.
We will need to create a transaction with the Add Transaction API endpoint.
make sure the redemption_id matches the id of your reward redemption in the previous step
{
    "total": "10",
    "profile_id": "{YOUR_PROFILE_ID}",
    "transacted_at": "2021-02-10 00:00:00",
    "timezone": "Australia/Melbourne",
    "items": [
        {
            "name": "Birthday Cake",
            "product_variant_id": "1",
            "quantity": "1",
            "price_current": 9.99,
            "price_sell": 9.99,
            "is_void": false,
            "price_original": 9.99,
            "price_margin": 1,
            "tags": ["birthday"]
        }
    ],
    "redemption_id": 158,
    "external_id": "91040123233311",
    "total_original": 9.99,
    "is_void": false,
    "margin": 1
}
Finally, navigate to the transaction in your Omneo CX Manager,
and you'll notice that your new transaction, has a redemption balance attributed against it.
This is how we know, this particular transaction was responsible for redeeming $10 off the profiles reward balance.
Updated 8 months ago
